Adding Functionality to the Backend – Building a Blog
Previously in Building a Blog: Insert Data in MongoDB with Spring Boot
The proof of concept worked like a charm. Now, I need to create the basis by adding functionality to the backend. Today, I’ll start with creating a blog post and see what challenges lie ahead on the road.
So, before I start implementing the full feature of creating a blog post, I had to remove the testing code I created last time in my proof of concept. With a clean BlogPostController, I can further structure my Spring Boot project.
High-Level Project Structure
I want to keep my business logic separated from my controller layer, even though there might not be a whole lot of business logic to a blog backend. Between my controller and repository layer, I add a service layer. So, essentially, we get the following structure in my project.
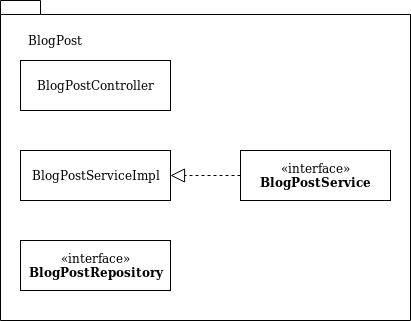
As you can see, I’m using a BlogPostService interface and a BlogPostServiceImpl for the implementation class. In this case, I’d like to use interfaces to future proof my software in case I need to change something in the implementation of my service. At school, I never really understood why, but this post on StackExchange has helped me understand this better.
Adding Functionality
Personally, I like to work from bottom to top when it comes to adding new functionality to my backend. Right now, I want to start with the first CRUD operation: create. I expect my frontend to deliver a blog post object in the request body, therefore I’m using my blogpost object in my code.
BlogPostService Interface
So, building from bottom to top, I start with my BlogPostService interface first. For now, the interfact is still quite empty, but that will change soon enough when adding more functionality of course. For now, my interface looks like this.
public interface BlogPostService {
    public abstract void CreateBlogPost(BlogPost blogPost);
}
BlogPostService Implementation
With the interface in place, I now have to write the implementation of the method in my BlogPostServiceImpl with the same bit of code I used last time for MongoDB. Also, I have annotated the class with @Service to let Spring Boot know that this is a service component within my application. Furthermore, I have autowired MongoTemplate, so I can use it freely for saving my blog post to the database.
@Service
public class BlogPostServiceImpl implements BlogPostService {

    @Autowired
    private MongoTemplate mongoTemplate;

    @Override
    public void CreateBlogPost(BlogPost blogPost) {
        mongoTemplate.save(blogPost, "blogposts");
    }
}
BlogPostController
Finally, I can write the code for my controller layer. I’ve added a couple annotations to my BlogPostController versus last time.
@RestController()
@RequestMapping("/blog")
public class BlogPostController {

    @Autowired
    private BlogPostService blogPostService;

    @PostMapping
    @ResponseStatus(HttpStatus.CREATED)
    public void createBlogPost(@RequestBody BlogPost blogPost) {
        blogPostService.CreateBlogPost(blogPost);
    }
}
Let’s go through the annotations. I have started with adding @RestController above my class to notify Spring Boot that this is a controller component, specifically one that accepts REST requests. Furthermore, I have added a custom endpoint set with @RequestMapping("/blog"). That means that every endpoint within this controller is http://localhost:8080/blog. For every method, I have to define what type of method it is with the @PostMapping annotation.
If you want to change the endpoint per method, you can add the name of the endpoint as a string in brackets behind
@PostMappinglike this:@PostMapping("/test"). The full endpoint for this method will behttp://localhost:8080/blog/test. Of course, you can do this for all request types.
The last annotation, @ResponseStatus(HttpStatus.CREATED) allows me to define what response I want my backend to send back. At this stage, I haven’t yet figured out how to throw the exceptions yet. I still have to figure that out, and when I do, I’ll write about it of course. For now, this will have to do and it serves its testing purposes.
Last, but definitely not least, I have used the @RequestBody annotation before my BlogPost variable. This annotation lets Spring Boot know to check in the request body for the blog post object, which the service use to save the post to the database.
Testing My Feature
Excited with my new bits of code, I was eager to test if it works. I run my first test with curl, since I don’t have Postman available on my Debian laptop. Failed. Damn it. I check what I tried to send as my request body, and I noticed that I misspelled endpoint. There must be a way to validate the object to get a cleaner error message, right?
Java Bean Validation
After a quick search, I came across two articles (this one and this one) from Baeldung on Java Bean Validation. With a simple annotation, the bean automatically validates the input in the request body to match the object. I only have to make some tiny adjustments.
First, I have to add two dependencies to my pom.xml file:
<dependency>
    <groupId>org.hibernate.validator</groupId>
    <artifactId>hibernate-validator</artifactId>
</dependency>
<dependency>
    <groupId>org.hibernate.validation</groupId>
    <artifactId>hibernate-validator-annotation-processor</artifactId>
<dependency>
After letting maven do it’s thing, I only have to add the @Valid annotation before the request body annotation, and that’s it! Now, the function should work.
Date Format
Yeah, not a chance. The function still doesn’t work. This time, I’m getting a parsing error on the data I input. Fortunately, Baeldung came to the rescue again with a little article on the JsonFormat annotation. I added a small adjustment to my BlogPost class with the following line of code:
@JsonFormat(pattern="dd-MM-yyyy HH:mm")
private Date publishDate;
Functionality Added!
At long last, I am able to post a blog post! It is far from perfect yet, as I still have to figure out how to get the exceptions to work. Furthermore, I still have to write unit tests as well to make sure that my code is working as expected. That is what I’ll be working on the upcoming few days. Once I get these two parts done, I can continue with adding even more functionality like getting and deleting a specific or all posts.
Next Up in Building a Blog: Check for Unique Documents in MongoDB with Spring Boot