Insert Data in MongoDB with Spring Boot – Building a Blog
Previously in Building a Blog: Securing Database Credentials
Last time, we set up our database and Spring Boot project, and secured our database credentials. Now, we have to configure MongoDB in our project. Then we can start to insert data in mongodb and getting a feel for the queries to get the data from the database.
Configuring Spring Boot to Access MongoDB
To get started, we need to configure our Spring application, so our application knows where the database is to begin with. We do that by adding the following lines to the application.properties file in the resources directory.
spring.data.mongodb.host=localhost
spring.data.mongodb.port=27017
spring.data.mongodb.database=rosafiore
spring.data.mongodb.authentication-database=admin
When configuring MongoDB, we added a user to our database. This user uses the admin database to authenticate, and thus to access the other databases. That’s why we need to define the authentication database, rather than just inputting the credentials to the database we will be talking to.
However, we still have to insert our secured credentials. Truth be told, it took a long time to get this one figured out. There was no clear resource online that I could find. So, after a lot of digging and trying, I have managed to create a mongo configuration that inserts the secured credentials and creates a connection to the database.
MongoConfig
So, let’s get started with this new config file. First off, we need to create a new class in our project. I call it MongoConfig, because it contains the configuration for MongoDB. We have to annotate the class with the @Configuration and @EnableMongoRepositories. That way, Spring Boot knows that this is a configuration class, and thus must be taken along during initalization and to enable the repositories. Furthermore, we need to inherit the AbstractMongoClientConfiguration for a couple of methods to complete our configuration. So, our bare config class now looks like this:
@Configuration
@EnableMongoRepositories
public class MongoConfig extends AbstractMongoClientConfiguration {

    @Override
    protected String getDatabaseName() {
        return null;
    }
}
In this class, we will create our own MongoClient to insert data in mongodb. For this, we need the properties we’ve defined in our application.properties file. We can access the properties by using a spring annotation on our local variable: @Value("${<property name>}"). With this construction, we create our variables with our property values and use them for configuring our client. One such variable will look like this in code:
@Value("${spring.data.mongodb.database}")
private String database;
As you might have seen a bit before, the MongoConfig class inherited the method getDatabaseName(). There, we have to replace the null value with the database variable. Now, we need to dive into configuring the MongoClient itself.
MongoClientSettings
After searching for some time, I came across the mongodb documentation for connecting to a database. Further down the page, I finally found what I was looking for: applying custom settings. I decided to create a separate private method to configure the settings to keep things tidy. Here is the code for my settings and I’ll walk you through the code as we go.
private MongoClientSettings setMongoClientSettings() {
    MongoCredential credential = MongoCredential.createCredential(
        Config.USERNAME, authDatabase, Config.PASSWORD);

    return MongoClientSettings.builder()
            .credential(credential)
            .applyToClusterSettings(builder ->
                    builder.hosts(Arrays.asList(new ServerAddress(host, port))))
            .build();
}
I start off with defining the credentials and the authentication database for my client. That is where I get to use my secured database credentials, instead of hardcoding them.
Then comes the MongoClientSettings.builder(), that is where the actual settings are created. The first thing I do, is setting the credentials to the one I created earlier in the method. Next, I need to configure the location of the database in the applyToClusterSettings. Here, I set the host to a new ServerAddress with the host and the port number. Finally, the building can create the settings and return those. The settings are then used to create the MongoClient for Spring Boot to use.
@Override
@Bean
public MongoClient mongoClient() {
    return MongoClients.create(setMongoClientSettings());
}
So, the MongoConfig class now looks like this:
@Configuration
@EnableMongoRepositories
public class MongoConfig extends AbstractMongoClientConfiguration {

    @Value("${spring.data.mongodb.host}")
    private String host;

    @Value("${spring.data.mongodb.port}")
    private int port;

    @Value("${spring.data.mongodb.database}")
    private String database;

    @Value("${spring.data.mongodb.authentication-database}")
    private String authDatabase;

    @Override
    protected String getDatabaseName() {
        return database;
    }

    @Override
    @Bean
    public MongoClient mongoClient() {
        return MongoClients.create(setMongoClientSettings());
    }

    private MongoClientSettings setMongoClientSettings() {
        MongoCredential credential = MongoCredential.createCredential(
            Config.USERNAME, authDatabase, Config.PASSWORD);

        return MongoClientSettings.builder()
                .credential(credential)
                .applyToClusterSettings(builder ->
                        builder.hosts(Arrays.asList(new ServerAddress(host, port))))
                .build();
    }
}
Insert Data in MongoDB
With our configuration completed, it is time to set up the rest of the code to insert data in mongodb. For this, we first need to create a class that is basically the blueprint of our object. In my case, I want to start out with a simple blogpost object and the data I expect in it.
BlogPost Model
As I explained in Choosing a Database: SQL or NoSQL?, my blogpost object contains the following properties:
- EndPoint
- Publish Date
- Categories
- Tags
- Blog Post (the content)
I reflected these properties in my BlogPost class which looks like this (I removed the getters and setters to avoid clutter):
@Document(collection = "blogposts")
public class BlogPost {

    @Id
    private String documentId;
    @Indexed(unique = true)
    private String endPoint;
    private Date publishDate;
    private List<String> categories;
    private List<String> tags;
    private String article;
}
As you can see, I annotated the class with the @Document annotation. That allows me to choose the name of the collection where mongodb will be storing my blog posts. Furthermore, I have created a documentId with the @Id annotation to inform mongodb that this property will contain the ID for every blog post object stored in the database. Finally, I have added the @Indexed(unique = true) annotation to my EndPoint property. This annotation allows me to have mongodb check if the property is actually unique. I don’t want duplicate endpoints for my blog posts after all!
BlogPost Repository and Controller
With the model complete, it is time to insert the first blog post in the database. For this, we need a Repository first. Fortunately, this is a relatively simple one, I only need to create the interface and that is about it for now.
With that, the BlogPostRepository looks like this:
@Repository
public interface BlogPostRepository extends MongoRepository <BlogPost, Long> {
}
That is it for the repository, now we can continue with the controller. The controller contains the endpoints for our requests. I’ve made this a very simple controller, because it is still a proof of concept for me. I created two methods: one for posting a blog post and one for getting a blog post. For the POST method, I have hardcoded the values for the blog post.
In order to insert data into mongodb, I’ll be using MongoTemplate which I only have to autowire into the application like this:
@Autowired
private MongoTemplate mongoTemplate;
With the mongoTemplate autowired, creating the POST and GET method was relatively easy and straightforward.
@PostMapping
    public void createPost() {
        BlogPost blogPost = new BlogPost();
        blogPost.setEndPoint("/test");
        blogPost.setPublishDate(new Date());
        blogPost.setCategories(Arrays.asList("TestCategory"));
        blogPost.setTags(Arrays.asList("TestTag"));
        blogPost.setArticle("testPost.md");

        mongoTemplate.save(blogPost, "blogposts");
    }

    @GetMapping
    public List<BlogPost> getPost() {
        Query query = new Query();
        query.addCriteria(Criteria.where("endPoint").is("/test"));
        return mongoTemplate.find(query, BlogPost.class);
    }
}
Of course, the only way to know for sure, is to test it. So, I went into Postman, inserted the requests and finally, after a long days struggle I get the following response when trying to obtain the blog post that I inserted.
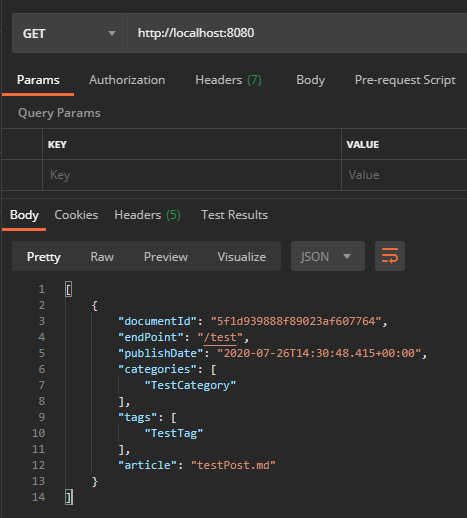
With that, I have finally managed to insert data in mongodb! Now, I can start with expanding the backend code with more endpoints. Furthermore, I need to decide how to proceed with this project and what steps I will take next.
Next Up in Building a Blog: Adding Functionality to the Backend